Dr. Ali Tunkiwala
MDS Prosthodontics, Private Practitioner,
Mumbai
ABSTRACT :
The multifactorial nature of tooth wear with regards to its aetiology poses several problems in making a definitive diagnosis. In several cases attrition and erosion work at different points in time to create severe tooth surface loss in the same dentition. The clinician examining the patient at a specific point in time needs to assimilate all the clinical data and then make an accurate diagnosis and risk assessment. The treatment philosophy is such cases is to remain minimally invasive wherever possible. This article presents a systematic approach to rehabilitation of the patients that are afflicted by these maladies with a combination of digital and adhesive protocols.
Keywords: Tooth wear, Attrition, Erosion, Parafunction, Adhesive dentistry, Digital Dentistry, Full mouth Rehabilitation
Citations: Tunkiwala A. A Methodical Approach to Full Mouth Rehabilitation. J Prosthodont Dent Mater 2021;2(1): 58-67.
INTRODUCTION
The process of complete dental rehabilitation requires the clinician to create a roadmap, a pathway that can be followed to produce predictable results. Having a clear vision of the end result and knowing how to successfully navigate the important milestones on the way is paramount to long term success of these cases.1 For the sake of convenience and understanding, we propose dividing the treatment into 4 phases and 10 distinct restorative steps. As with any complex treatment, the phases may be interchangeable and some steps may be omitted if needed. The aim here is to provide a road map with key milestones marked so as to place the necessary emphasis on those points.
In several cases, the need for full mouth rehabilitation arises from the wear patterns that destroy the dentition. In others, the rehabilitation is needed as a part of the process of repeating all old restorations or replacing all missing teeth with implants. The mechanisms of attrition, abrasion and erosion may act together, each with different intensities and duration to produce a multitude of different wear patterns (Fig. 1-4). Management of such complex wear patterns varies as per the severity of its manifestations and the patient’s reported symptoms of thermal and tactile sensitivity. The management will also depend on the extent of the lesion intraorally as far as number of teeth affected.2 If the erosion is localized in the anterior zone with no posterior wear, orthodontic therapy, restorative therapy or the modified Dahl’s Concept may be the ideal choice.3 Thus, the treatment may vary from preventive strategies, to bonding and in severe cases changes in the vertical dimension of occlusion and full coverage restorations. The balance between the degree of intervention and the ethical need to be minimally invasive should always be maintained. In day-to-day practice, maintaining this balance is always a difficult call and several factors govern that decision.
58

Phases in Complex Rehabilitation:
It is important to arrive at a comprehensive aesthetic and functional problem list for each patient.
Phase 1: Remove faulty restorations and assess all teeth for structural worthiness.
Phase 2: Foundation Work & Surgical Phase: Extractions, Implants and Crown lengthening as needed and other periodontal procedures as required. Any endodontics if necessary, to be carried out.
Phase 3: Final restorative phase. Follow the 10 steps listed below.
Phase 4: Maintenance phase.
The aim of this write up is to provide the clinicians with a guideline on Phase 3 (Restorative) of the treatment.
Ten Steps in FMR:
1. DATA COLLECTION AND DIAGNOSIS.
2. MOUNT UPPER CAST WITH CORRECT ORIENTATION RELATION.
3. DEPROGRAM AND MOUNT LOWER CAST WITH CENTRIC RELATION.
4. FINALIZE VERTICAL DIMENSION AND GET DIAGNOSTIC WAX-UP COMMISSIONED.
5. FABRICATE BONDED MOCK-UPS OR PROVISIONALS.
6. DECISION MAKING FOR FINAL RESTORATIVE MATERIAL.
7. VOLUME BASED TOOTH PREPARATIONS.
8. TISSUE MANAGEMENT, IMPRESSIONS & BITE RECORDS.
9. BONDING/DELIVERY.
10. DILIGENT OCCLUSAL MANAGEMENT.
Workflow with clinical examples:
Let us see each of the steps above with clinical discussion of their salient features.
STEP 1: DATA COLLECTION AND DIAGNOSIS
Clinical examination, full dental photography and pre-operative video analysis must be carried out and findings charted (Fig. 5-12). The musculature as well as TMJ examination is done to ascertain a negative load test. In cases where load test is positive, splint therapy is recommended. Most cases with pain in TMJ region could be muscle related problems that get solved with diligent deprogramming.
A radiographic examination must be carried out to evaluate the bone condition and chart out any pathology. Carious lesions as well as defective endodontics and open margins on old restorations must all be evaluated with pre-operative radiography. If implants are needed, a CBCT will be added to the data in the early stages. Cephalometric analysis is needed at this stage to evaluate the preoperative vertical dimension of occlusion and overall jaw and teeth positions.
59

STEP 2: MOUNT UPPER CAST WITH CORRECT ORIENTATION RELATION
The upper cast must be mounted with a facebow record that allows aesthetically correct orientation relation. The pre-existing cant in the maxilla must be recorded in relation to the facial midline to allow accurate decision making regarding the midline and the axial inclinations of the upper anterior teeth and an upper occlusal plane that is parallel to the horizon. We prefer using a dentofacial analyzer to orient the maxillary cast due to its obvious advantages from aesthetic standpoint and not the ear piece facebow with a plethora of anterior reference points that can lead to an aesthetically erroneous mounting if not done with due diligence (Fig. 13).
60

STEP 3: DEPROGRAM AND MOUNT LOWER CAST WITH CENTRIC RELATION
The patient must be deprogrammed before the centric bite record to allow the jaw relation record to be taken at optimal joint position. An aluwax wafer may be used to record the centric relation using a Lucia jig or Kois deprogrammer may be used to record the CR at an increased vertical dimension of occlusion (Fig. 14).
STEP 4: FINALIZE VERTICAL DIMENSION AND GET DIAGNOSTIC WAX UP COMMISSIONED
Aesthetics, phonetics and cephalometrics combine to give the required guidelines for the increase in vertical dimension of occlusion for cases with generalized wear.11 Judicious changes in vertical dimension will allow the tooth preparations to be conservative and allow the vitality of most teeth to be maintained. Changes in vertical dimension are well tolerated in patients with healthy joints and when there is friction free stable occlusion. Once an empirical vertical dimension is arrived the case is sent to the lab for diagnostic wax up. All the changes that are desired in the case must be achieved with the wax up. Restorative designs; onlay, veneers or full coverage must be finalized during the wax-up (Fig.15-16).

STEP 5: FABRICATE BONDED MOCK UPS OR PROVISIONALS
61
There are several methods to make provisional restorations for the full mouth. The ideal requirements of these provisional restorations are that they can be made without any tooth preparation. Indirect, lab fabricated provisional restorations can be fabricated in this manner provided the dentition and teeth don’t have large undercuts. Usually the lab fabricated, indirect, provisional restorations are made in form of an overlay on the whole arch. Direct techniques, however offer some advantages as these can be bonded intraorally and thereby allow a perfect test drive for the final aesthetics and occlusion. However, errors in placement of the matrix during the making of the provisional restorations can lead to inadvertent increase in vertical dimension and subsequent mismatch in occlusion that may need a lot of corrections.13 It is advisable to measure the distance between the free gingival margin of the upper and lower cuspids on the wax up and achieve that dimension after the provisional restorations have been made and adjusted.
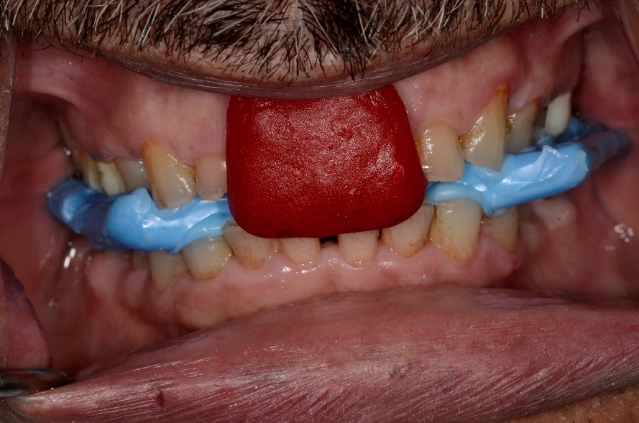
All teeth in one arch must be isolated and etched with 37% phosphoric acid for 10 seconds, followed by drying and application of universal adhesive. Once the adhesive is cured, the Bis-GMA based chemically cured resin is loaded on the putty-wash matrix generated from the diagnostic wax up (Fig. 17). With correct orientation the putty matrix is seated on the teeth. After the material has set, the putty matrix is removed and the gross excess material cleaned from the teeth (Fig. 18). The procedure is then repeated on the opposing arch. Fine tipped finishing carbide and a 12-number blade should be used carefully to remove all excess material from the gingival sulcus around all teeth.
The overall aesthetics of the smile is evaluated. Phonetics is verified and the occlusion is adjusted to achieve uniform equal intensity contacts on cuspids and all posterior teeth. Shim stock is used to check the occlusal contacts. The incisors must not hold the shim stock. After adjustment of the static occlusion, the dynamic occlusion is checked using the protocol of pathway adjustments. 200 micron articulating paper is used for the same and the patient, in upright position is asked to chew on it. All the dynamic contacts that create friction in the chewing pathway are removed and the provisional restorations are then polished and coated with a surface sealing agent to prevent discoloration (Fig.19-20).
The provisional restoration phase is an important milestone in the full mouth rehabilitation. It’s the phase where all the decisions made in the early phases of diagnosis and risk assessment that culminated in the diagnostic wax up are now tested intraorally. A successful outcome with this phase will go a long way in achieving a successful outcome with the definitive restorations.
The patient should be allowed to use the provisional restorations for a couple of weeks and at the end of that period, if there are no negative signs reported in the musculature or the joint, phonetics is comfortable and aesthetics acceptable, the clinician must record the approved provisional in form of digital data or an analogue impression that can be used as a guidance in the laboratory.

62
STEP 6: DECISION MAKING FOR FINAL RESTORATIVE MATERIAL
Porcelain fused to metal, zirconia and lithium disilicate are the various options for the final restorations. While it’s not within the scope of this article to bring out advantages and disadvantages of each of these, it is important to mention that the material that needs the least tooth preparation to provide the most durable and aesthetic result must be chosen. If occlusal clearance without excessive tooth prep is not an issue it could be monolithic or stained lithium disilicate for posteriors and layered option for anteriors. If clearance is on lesser side zirconia may be the chosen option as it would be also in case a bridge in stress bearing area had to be fabricated.
After the impressions are received in the lab, the scan data of the approved provisional restoration is superimposed on the definitive preparations to allow the final restorations to be of the same length. The occlusal plane is replicated from the scans of approved provisional restorations and the labial and lingual morphology is worked upon to get a good surface texture and finish. If digital impressions are done the upper and lower models were 3D printed to allow the seating of all restorations on them and adjust the proximal and occlusal contacts as well as accomplish the layering.
STEP 7: VOLUME BASED TOOTH PREPARATIONS
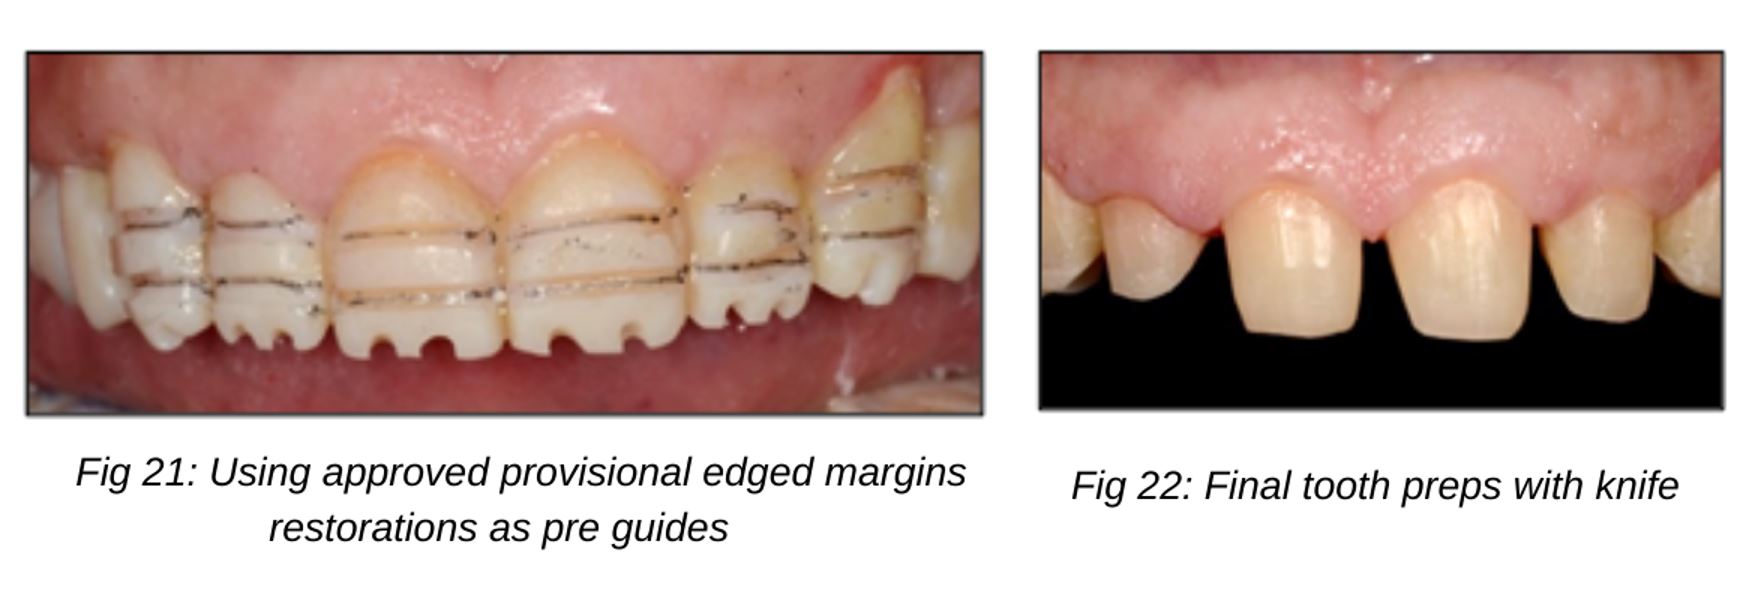
Once the patient is comfortable with the function and aesthetics of the provisional restorations, the next step is to accomplish all the foundation work on the teeth. Procedures such as endodontics, fillings and post and cores as needed are done quadrant wise. The provisional restorations from one quadrant may be removed by cutting them off and new ones made at the end of the sitting when the foundation work is completed. In this way all the required teeth are treated and the patient is now ready for the definitive impressions. The final impressions for all the teeth for full arch restorations can be done at one time. The challenge here is to see that the approved vertical dimension does not fluctuate. To prevent any change in vertical dimension of occlusion, the upper and lower anterior teeth are prepared first. Depth cuts are used on the provisional restorations to control the preparation (Fig. 21).
This allows us to get adequate room for the final restorations and at the same time enables conservation of enamel. At this point it is crucial to finalize the material choice and restorative design specifics as each material will have different tooth preparation requirements. The final preparations of anterior teeth are done using the bonded provisional restoration as a prep guide. The margin geometry is kept knife edged so as to allow a conservative preparation on all teeth that saves the residual enamel for bonding (Fig. 22). Preparing deep chamfers and creating a very prominent horizontal margin geometry may produce weakening of the tooth structure and increased incidence of biomechanical tooth failures. After the anterior preparations are finalized, a lucia jig is constructed intraorally with the posterior provisional restorations still in place. Thereafter, the posterior teeth are prepared to receive the full coverage restorations again with knife edged-equigingival margins. The lucia jig on the anterior preps is used to maintain the vertical dimension of occlusion and ensure adequate room for the final restorations on posterior teeth.
STEP 8: TISSUE MANAGEMENT; IMPRESSIONS AND BITE RECORDS
63
Tissue management could be done with gingival retraction cord soaked in aluminium chloride (Fig. 23-24). Digital or analogue impressions are taken for the upper and the lower prepared teeth (Fig. 25-26). The bite record is done on the posterior teeth while the lucia jig is holding the vertical dimension as an anterior stop (Fig. 27-28). A facebow record should be done again to orient the maxillary working cast in an aesthetically correct position (Fig. 29-30).


STEP 9: BONDING/DELIVERY
64
Trials should be carried out and the final checks performed to verify aesthetics. Proximal contacts must be checked and occlusion marked to see that uniform equal intensity bilateral contacts are achieved. After final glazing the restorations are bonded using the adhesive protocol (Fig. 31). A rubber dam must be utilized for strict isolation as far as possible. If a large part of the occlusal surfaces of the posterior teeth are in dentin, selective etching is done where the enamel could be etched for 15 seconds with 37% phosphoric acid and the dentin for 5. Dual cure resin cement must be used on the silanated intaglio of the lithium disilicate restorations that are thicker than 1mm to allow all resin to cure. The excess cement must be carefully removed from the gingival sulci and all the interproximal areas. Radiographs should be taken to confirm removal of all residual cement (Fig. 31-37).

STEP 10: DILIGENT OCCLUSAL MANAGEMENT
Occlusion check must then be performed to achieve uniform contacts of equal intensity on all teeth with 40 micron articulating paper. Thereafter the final finishing of occlusal contacts should be done with 8 microns and uniform contacts of equal intensity should be achieved on all teeth from cuspids to molars. The incisors must be adjusted to not hold the shimstock (Fig. 38). Pathway adjustments should then be carried out as by seating the patient upright and using a 200 micron horseshoe shape paper for marking the chewing contacts. Stressful contacts in chewing pathway are eliminated to provide a friction free occlusion. All the surfaces that are adjusted after bonding must be polished using a dedicated system for intraoral finishing and polishing of lithium disilicate.
65

Fig 38: Shim Stock held by all teeth from canine backwards
CONCLUSION :
Teeth wear is multifactorial. Attrition, abrasion and erosion can contribute to tooth surface loss in the same dentition at different points in a lifetime. Organized data collection and methodical analysis of the cause of tooth wear is imperative to generating a treatment decision that will be successful in the long term. In such advanced wear cases, it may be necessary to reconstruct the dentition with minimally invasive indirect restorations or full coverage based on the degree and cause of destruction. Adhesively bonded restoration done with prudent tooth preparation techniques allows these to remain conservative while saving the maximum enamel possible. A robust anti-wear friction free occlusal management system is mandatory.
Acknowledgements:
Dr Sabita Ram for her teachings and blessings & Mr. Danesh Vazifdar at Adaro Dental Laboratory, Mumbai for the Ceramic Artistry.
REFERENCES :
1. Rufenacht C. Fundamentals of Esthetics. US:Quintessence Publishing,1990. 15-135.
2. Meurman JH, Sorvari R. Interplay of erosion attrition and abrasion in toothwear and possible approaches to prevention; Tooth Wear and Sensitivity. London: Martin Dunitz, 2000. 171–180.
3. Tunkiwala A, Chittguppi R. Conservative functional and aesthetic rehabilitation of severe palatal erosion (Class IV) using modified dahl approach. Compendium. May 2017. Vol 38. No. 5. 2-7
4. Kois JC. No Dentistry is Better than No Dentistry…Really? J Cosmet Dent. 2016 Spring; 32(1):54-61.
5. Fradeani M. Esthetic Analysis: A Systematic Approach to Prosthetic Treatment. Vol 1. Chicago, IL: Quintessence Publishing; 2004.
6. Kois JC. New challenges in treatment planning: Shifting the paradigm toward risk assessment and perceived value- Part 1. J Cosmet Dent. 2011 Winter;(26)4:62-9.
7. Kois JC. New challenges in treatment planning: Incorporating the fundamentals of patient risk assessment—Part 2. Journal of Cosmetic Dentistry. 2011:27(1):110-121
8. Dawson PE. Functional Occlusion: From TMJ to Smile Design. St. Louis, MO: Mosby; 2007:227-230.
9. Lux LH, Thompson G A, Waliszewski KJ, Ziebert GJ. Comparison of the Kois Dento-Facial Analyzer System with an earbow for mounting a maxillary cast. J Prosthet Dent. 2015 Sep;114(3):432-9
10. AACD Guide to Accreditation Criteria: Contemporary Concepts in Smile Design. www.aacd.com
66
11. Bakeman EM, Kois JC. The myth of anterior guidance. J Cosmet Dent. 2012 Fall;28(3): 56-62.
12. Magne P, Belser U. Bonded Porcelain Restorations in the Anterior Dentition: A Biomimetic Approach. Berlin, Germany: Quintessence Publishing; 2002.
13. Imburgia M, Canale A, Cortellini D, Maneschi M, Martucci C, Valenti M. Minimally invasive vertical preparation design for ceramic veneers. The International Journal Of Esthetic Dentistry. Vol 11, Num 4, Winter 2016
14. Chiche GJ, Pinault A. Esthetics of Anterior Fixed Prosthodontics. Chicago, IL: Quintessence Publishing; 1994.
15. Chaiyabutr Y, Kois JC, Kois DE. Effects of Occlusal Adjustment on Surface Roughness of All-Ceramic Crowns. J Dent Res. 2015;94 (Spec Iss A):3633.
67